Support
G2.0 Lightsets - Included Accessories
To ensure our customers continue to receive the best possible value when purchasing a Gloworm G2.0 lightset and to reduce unnecessary waste, as of April 2025 we have updated the accessories included with a new G2.0 light.
Due to the prevalence of fast chargers in today’s homes, we will no longer include a Gloworm Fast Charger with a new light. The following accessories will also need to be purchased separately if required…
- Bar mount if Adventure model lightset.
- Helmet mount if non-Adventure lightset
- Spare optics
- USB adaptors
Feel free to contact us at [email protected] if you have any questions around this.
Gloworm Link Mobile App
Customisation at your finger tips with LINK our Light Customisation Platform.
Our mobile app is the LINK to your perfect setup. It makes our light your light.
G2.0 user guide
User Guide & Videos
Introduction
- READ BEFORE USING - Safety
G2.0 Gloworm Lights are designed to be used in the harshest of conditions. However, their performance will vary depending on the exact situation and environmental influence. It is recommended that a spare light source is carried at all times to ultimately ensure your safety.
G2.0 Gloworm Lights are manufactured for specific activities and should be used only on completion of reading this User Guide.
As with any product designed to be used in the outdoors, Gloworm Lights present their own risks when in use:
>> Lights are designed to be moving when being used for extended periods. Failure to do so may result in the housing of the light becoming hot and light intensity decreasing.
>> Do not look directly into the light or shine the light directly at others. This could result in disorientation or eye damage.
>> When USB ports/connectors are connected the system is waterproof to IP67. However, it is advised that products are not submerged.
>> The USB Fast Charger is not designed for outdoor use. It should always be used indoors.
>> The light will emit a warning flash (5 flashes) when the Power Pack is at low capacity. Soon after the light will stop.
>> It is advised that the battery be disconnected from the light after use. The electronics will use a small amount of power and eventually discharge the battery OR the light may be switched on accidentally.
>> USB ports/connectors, when not connected, are sensitive to moisture. If ports/connectors are connected when wet, the light will protect itself by not operating. The port/connector will need to be dried in order for the light to operate.
- Applicable Light Models
The following User Guide is for Gloworm G2.0 Lights released in 2021. The user guide is applicable to the following models:
>> Gloworm X2 (G2.0)
>> Gloworm X2 Adventure (G2.0)
>> Gloworm XS (G2.0)
>> Gloworm XS Adventure (G2.0)
>> Gloworm XSV (G2.0)
Light Mounting
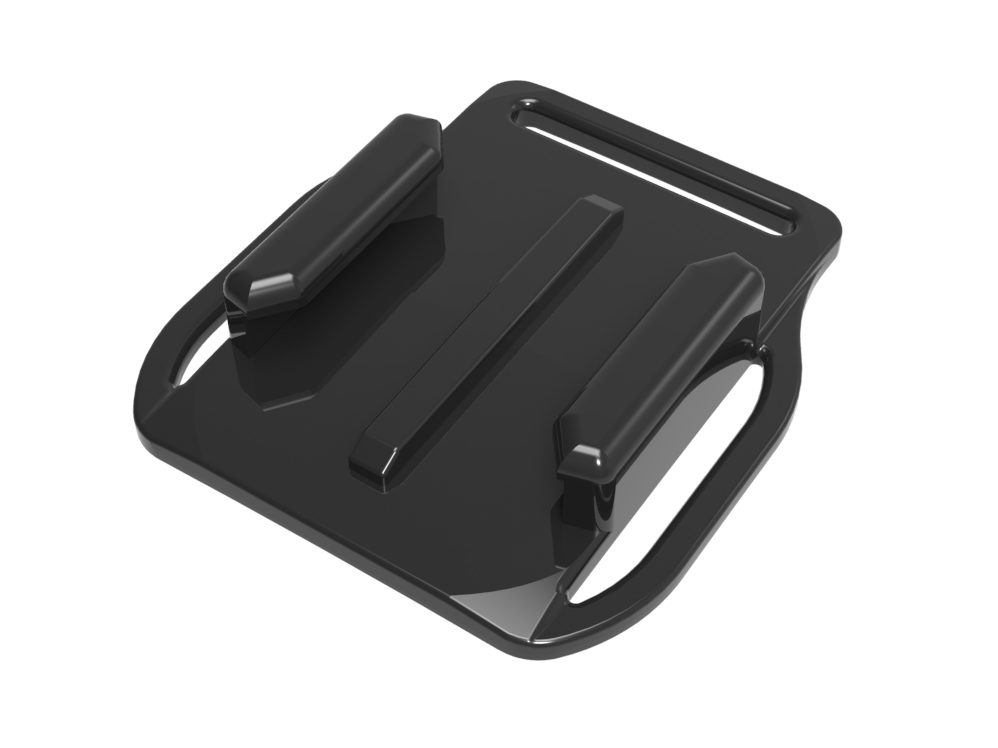
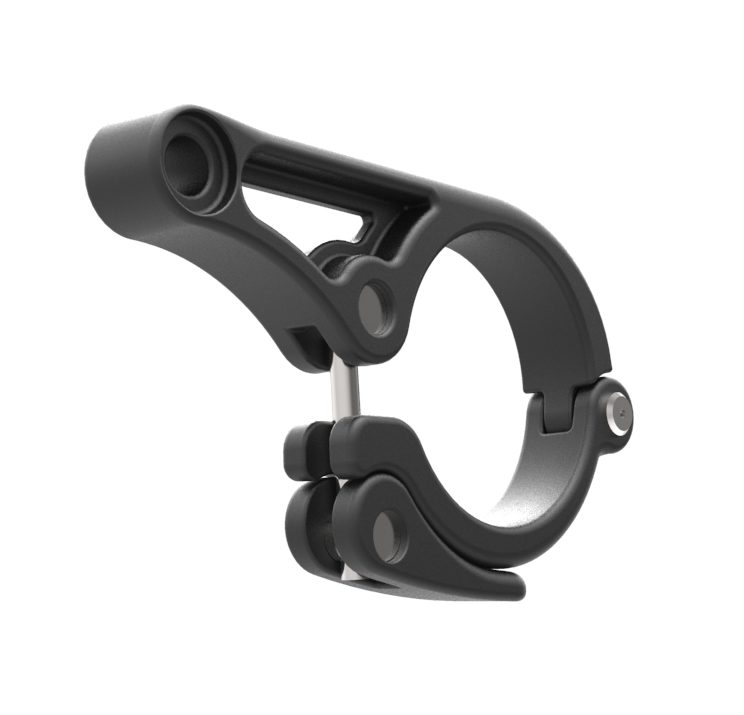
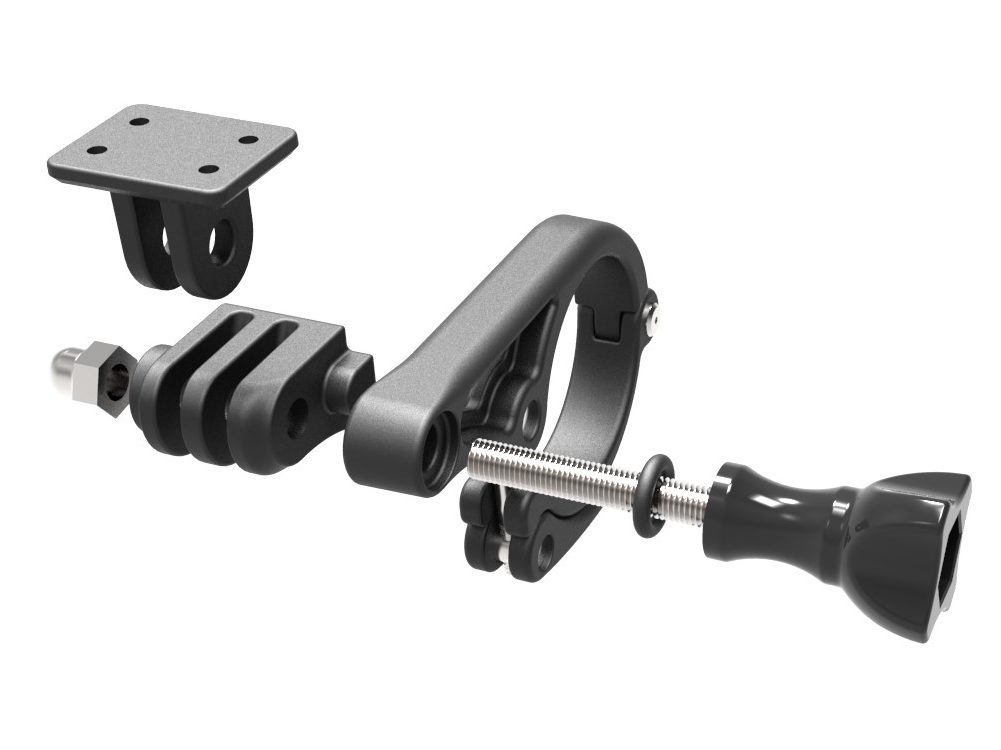
- Mounting Components
Universal Light Mount – Attaches to light, interface for the Universal Helmet Mount

Universal Helmet Mount – Slides into the Base Plate. Mates with Universal Light Mount
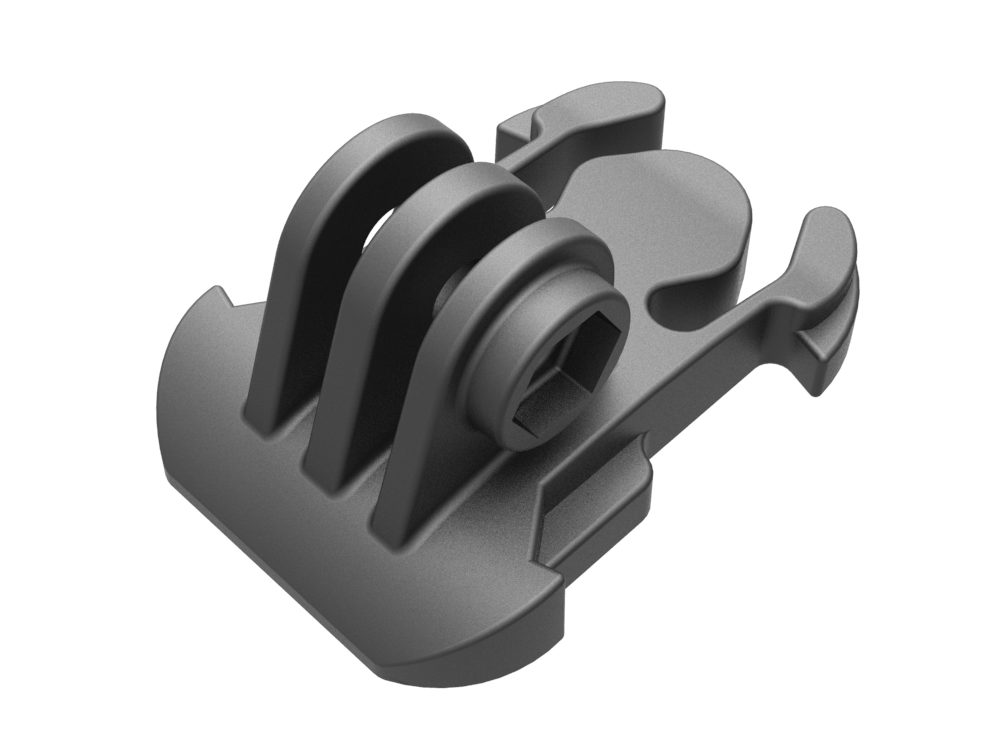
Base Plate – Attaches to helmet using supplied velcro. Interface for Universal Helmet Mount
Thumb Screw – Holds Universal Helmet Mount and Universal Light Mount together
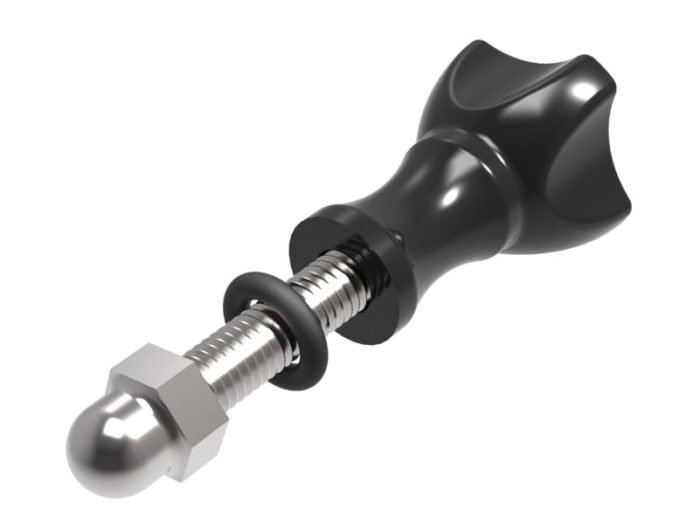
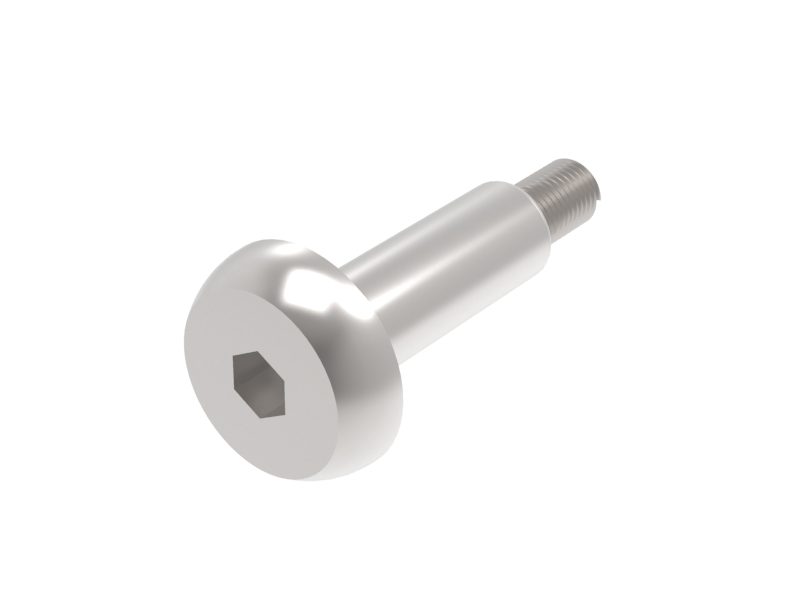
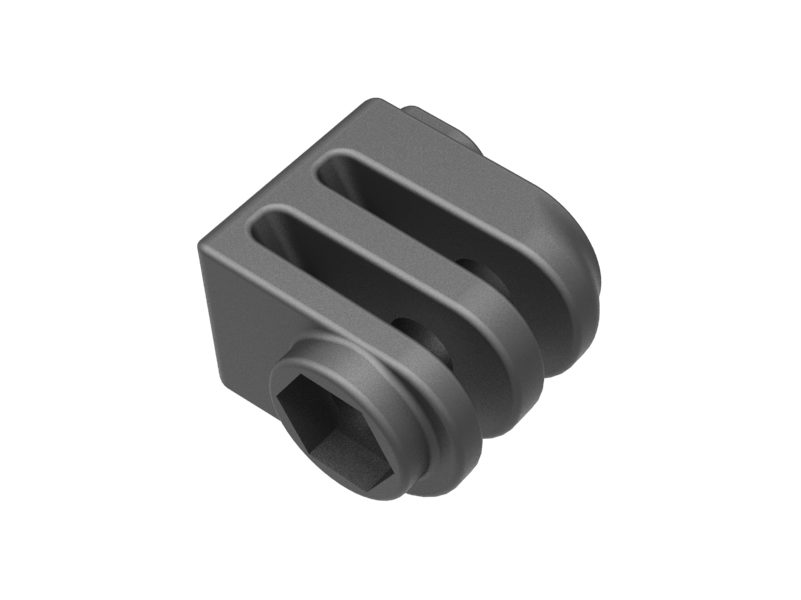
Quick Release Bar Mount – Mated with the Light Pivot Bolt, mounts light to bar
Light Pivot Bolt – Used in conjunction with two o-rings, secures light to the Quick Release Bar Mount
Universal Bar Mount (Optional Extra) – Can be mated to Quick Release Bar Mount with Thumb Screw as a bar mount option using the Universal Light Mount
- Helmet Mounting
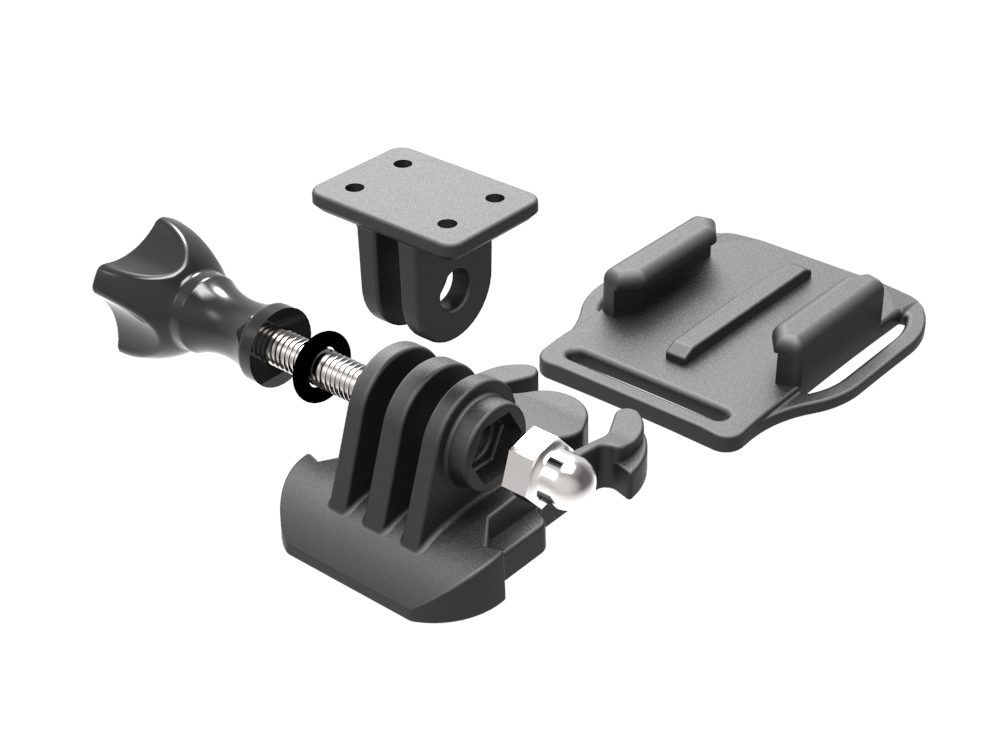
>> Attach Base Plate to Helmet using supplied velcro
>> Secure Universal Light Mount to light using supplied screws
>> Mate Universal Light Mount to Universal Helmet Mount using Thumb Screw, then tighten
>> Slide Universal Helmet Mount into Base Plate
>> Adjust angle of light to suit
- Bar Mounting - QR Bar Mount
>> Attach Quick Release (QR) Bar Mount to bar, ensuring it is tight enough that it does not rotate. For 31.8mm bars, use the supplied adapter shim
>> Slide Light Pivot Bolt into the QR Bar Mount. There should be one o-ring on either side of the mount.
>> Mate light to mount by threading the Light Pivot Bolt into the thread on the side of the light. Tighten until the light can still be turned but won’t move while riding. (Torque 4.5 Nm)
>> Adjust angle of light to suite the supplied adapter shim
- Bar Mounting - Universal Bar Mount
>> Secure Universal Light Mount to light using supplied screws
>> Mate Universal Light Mount to Universal Bar Mount
>> Slide Thumb Screw through the QR Bar Mount then the Universal Bar Mount/Light Mount
>> Tighten to ensure light does not rotate while riding
>> Adjust angle of light to suit
Light Operation
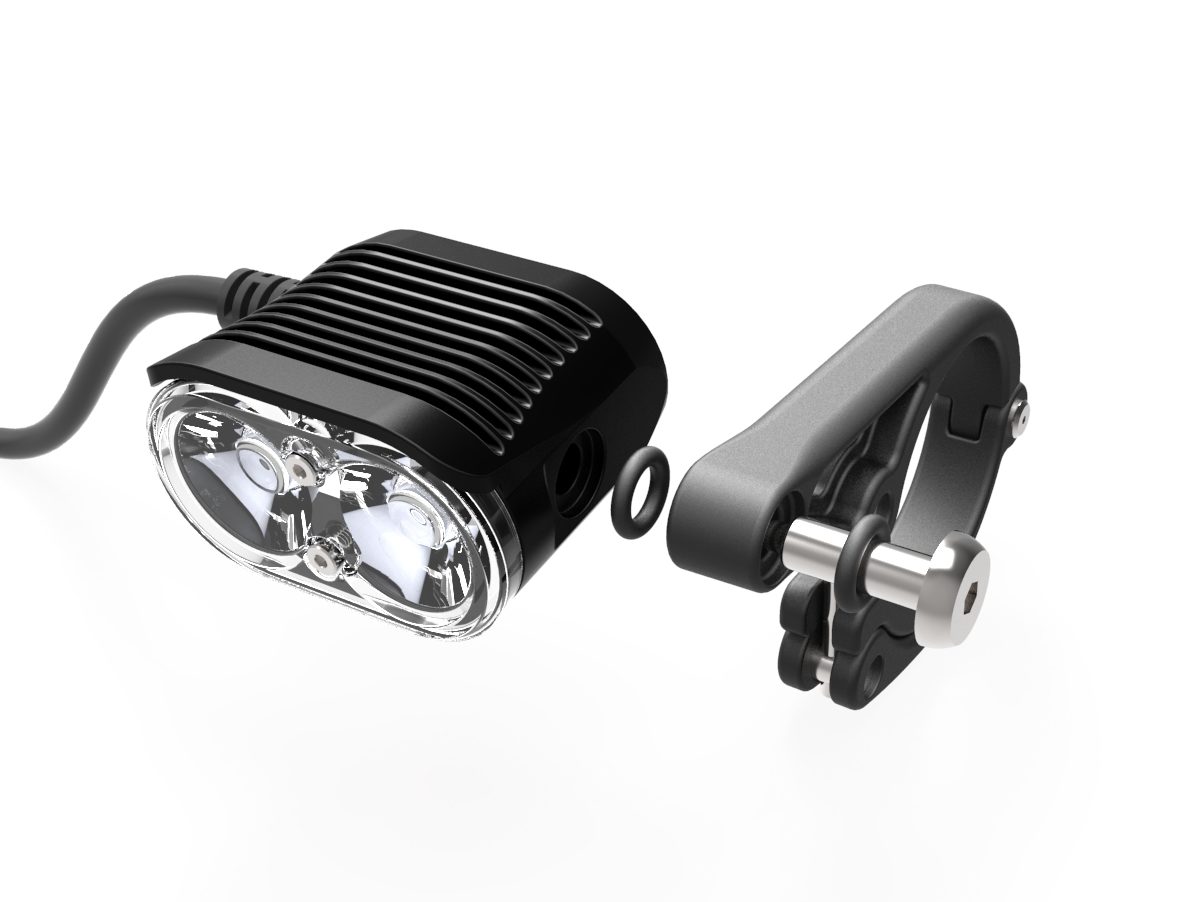
- Main Components
The main components required to operate a G2.0 Gloworm Light are:
>>Light head
>>TX Remote
>>Power Pack
>>Power Cable
>>Mount (for helmet, handle bar or headstrap)
- Basic Setup
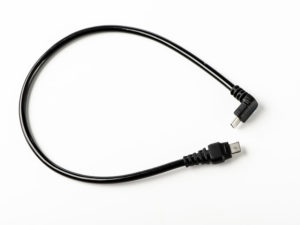
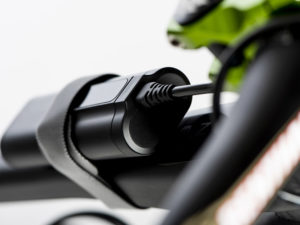
>> Gloworm G2.0 Lights are three part systems. Light, Power Pack and Power Cable. The Light and Power Pack are connected using the provided USB-C Power Cable (available in 3 lengths – regular, long, x-long).
>> The system is designed to be connected using the Power Cable once the Light and Power Pack have been mounted in the desired positions. This approach enables mounting without the inconvenience of cables getting in the way.
>> When connected, the system can be operated using the button on the light or TX Remote (if paired).
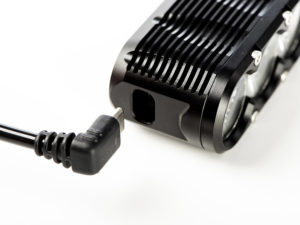
- USB-C Power Cable
The USB-C Power cable is unique to Gloworm. By using USB-C, Gloworm Lights can be more efficient, less cumbersome and more versatile.
The light system when connected is fully waterproof and robust, however care must be taken when removing the USB-C cable in wet conditions.
Moisture will not damage the port or the cable, but the electronics will not operate until connectors/ports are dry.
>> Ensure the cable ends are kept as dry as possible and free of debris
>> Ensure debris and moisture do not enter the USB-C port on the light or power pack
>> If a port or connector does get wet, usually a quick shake or shot of compressed air will dry it sufficiently.
>> Ensure the connector o-ring is in place before connecting the cable to light or power pack.
- Operation
When connected to the Power Pack, the light can be operated using the button on the back of the light OR, if paired, a TX (BT) Remote (See TX Remote section for details).
The default light levels are Level 1 (20%) | Level 2 (70%) | Level 3 (100%). Plus a FLASH function (Special Mode)
CONNECT LIGHT TO POWER PACK >> Button on light will glow red, yellow green, then blue. This indicates the light is ready to use. It is also the moment when a TX Remote could be paired.
TURN ON THE LIGHT >> Click the button once
CYCLE THROUGH LIGHT LEVELS >> A click of the button will change from Level 1 to Level 2 and another click will change to Level 3. A further click will return the light to the Level 1.
NOTE – As the light is cycled through light levels, the Power Pack OLED will display the selected the level (L1, L2, L3 etc).
ACCESS SPECIAL MODE (FLASH FUNCTION) >> Double click the button when the light is off. A click of the button when using the flash function will change the light to Level 1.
TURN OFF THE LIGHT >> When the light is on, hold the button down for about 2-3 seconds.
Note – Exact light levels will be dependent on any light level customisation that may have occurred.
- Firmware Updates
If a light requires a firmware updating it will be advertised when paired to the Gloworm Link mobile app. Firmware updates are made via Bluetooth and full instructions will be given via Gloworm Link. The button on the back of the light will glow PURPLE when updating firmware.
TX Remote
- Introduction
>> The TX (BT) is a Bluetooth remote that can be used to operate any Gloworm G2.0 Light. A TX (BT) can be identified by the grey buttons, as opposed to black buttons of the TX (RF).
>> The TX (BT) can operate a light from a range of up to 5m (line of sight). However it cannot be used to programme a light. NOTE Programming the Gloworm G2.0 Light can only be completed using the Gloworm Link mobile app.
>> The TX (BT) is designed to be mounted on the narrow part of a handlebar (22.2mm diameter), in a position easily accessible whilst riding.

The TX features 2 buttons – Button A and Button B. The TX can control individual and groups of lights using one or both buttons either independently or syncronised (linked).
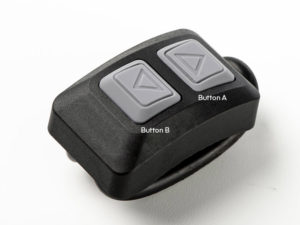
>> The TX is powered by a CR2032 button cell battery that can be replaced by removing the 4 small screws on the underside of the TX unit.
NOTE The TX (BT) uses Bluetooth (BT) to control a light unit. BT signals can be affected/degraded by other devices transmitting an EMF (electromagnetic field). Such devices include but are not limited to: Other lights, wireless bike computers, ANT+ devices, bluetooth devices. Degradation of signal can vary, so be sure to check the TX pairing and control ability before use. A usual sign that a TX has been affected by EMF is that an occasionally a button click will be unresponsive and have no affect on the light. Usually a subsequent click of the button will have the desired affect.
- TX (BT) Operation
>> The TX can control one light or multiple lights in any combination.
>> The TX has 2 buttons, A and B. In SINGLE BUTTON MODE, one light is paired to one button, either A or B. Control of the light is exclusive to the paired button.
>> Multiple lights can be paired to the same button, resulting in lights operating simultaneously.
>> Buttons A and B can be paired to different lights, providing independent control of each light or lights.
>> Pairing of the TX can occur within 15 seconds of connecting a Power Pack to a light. The Power Pack OLED display will show ‘PAIR TX’ and the button on the light will glow blue.
>> Subsequent lights can be added to an already paired button using the above Pairing Process. To synchronise the added light unit, press and hold the paired button until all lights are powered off – they are now syncronised.
>> A pair can only be broken by disconnecting the battery from the paired light.
NOTE – A light/multiple lights can only be paired to one button on one remote at any time.
>> The TX can also be configured to control a light or lights using button A to increase light levels and button B to decrease light levels. This is called
DUAL BUTTON MODE. i.e. At Level 1, button A can be clicked to increase to Level 2, then to Level 3. Button B must then be used to decrease the light level to Level 2 and back to Level 1.NOTE – If two or more lights are going to be syncronised, it is recommended that all lights are programmed with the same number of light levels. If light levels differ the lights will cycle at the same time but will not be in-sync.
- Pairing Process
>> Connect Power Pack to Light using Power Cable (or multiples if you wish to connect to the same button).
>> Button on light will glow red, yellow, green and blue. The OLED dsiplay on Power Pack will show PAIR TX.
The pairing window will remain open for 15 seconds.
>> Click the TX (BT) remote button you wish to use.
>> Light will flash ONCE, indicating the successful pair.
>> You can now control your light/s using the selected button.
NOTE – Repeat the process to connect additional lights to the same button.
- Single Button Mode
>> In Single Button Mode the TX will control the paired light/s using one selected button.
TURN ON THE LIGHT >> Click the button once
CYCLE THROUGH LIGHT LEVELS >> A click of the button will change from Level 1 to Level 2 and another click will change to Level 3. A further click will return the light to the Level 1.
ACCESS FLASH FUNCTION >> Double click the button when the light is off. A click of the button when using the flash function will change the light to LOW.
TURN OFF THE LIGHT >> When the light is on, hold the button down for about 2-3 seconds.
NOTE Exact light levels will be dependent on any light level customisation that may have occurred.
- Dual Button Mode
>> In Dual Button Mode the TX will control the paired light/s using both buttons. Button A to move up through light levels, Button B to move down through light levels.
CHANGE TO/FROM DUAL BUTTON MODE >> With the remote paired and light ON, hold down Button A, then at the same time, double click Button B. The light will flash once indicating the change.
At the time of changing to Dual Button Mode, lights paired to Button A and B will become syncronised.
NOTE – It is recommended that syncronised lights are programmed with the same number of light levels. If light levels differ the lights will cycle at the same time but will not be in-sync.
TURN ON THE LIGHT >> Click either button once
CHANGE LIGHT LEVELS >> A click of Button A will change from Level 1 to Level 2, another click will change to Level 3. A further click will return the light/s to Level 1.
ACCESS FLASH FUNCTION >> Double click either button when the light is off. A click of the button when using the flash function will change the light/s to Level 1.
TURN OFF THE LIGHT >> When the light is on, hold the button down for about 2-3 seconds.
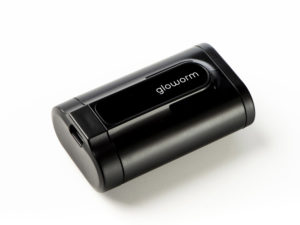
Power Pack
- Introduction
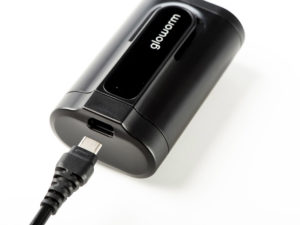
Gloworm Power Packs are lithium-ion powered battery packs designed to be fast charged using a Gloworm USB-PD (Power Delivery) charger. A 20W charger is included in each G2.0 light set and a 45W charger is available as an aftermarket accessory.
Each Power Pack features a single USB-C port and an OLED display. The USB-C port is used with a Gloworm Power Cable to power any G2.0 light (it is also used for charging the Power Pack), whilst the OLED display provides relevant information to the user. The Power Pack can also be used as a Power Bank to charge other devices.
Power Pack charge can be tested at any time by tipping the battery on its end (non-connector end) for about 3-4 seconds. This will activate the OLED screen to show the battery charge graphic. The OLED display will turn off after 30 seconds.
Silicone frame bumpers are included on each Power Pack to avoid any damage whilst mounted on frame or helmet. The Power Pack can be mounted using the included battery velcro. The velcro can be cut to size depending on the mounting location – Bar, helmet or headstrap.
The Power Pack casing is made from poly carbonate, making it very durable and resistant to breaking.
Specification Summary
>> Capacity Power Pack 5 – 5Ahr (8.4v)>> Capacity Power Pack 10 – 10Ahr (8.4v)
>> Dimensions Power Pack 5 – H x W x D: 31 x 50 x 85mm | 200g
>> Dimensions Power Pack 10 – H x W x D: 31 x 50 x 156mm | 366g
>> Connector – USB-C (Custom connector)
>> Adapter included for USB C (enable use of 3rd party cables) and USB Type A
>> Charger – 20W included, 45W aftermarket accessory
>> Drop Tested – 3 metres to concrete
>> OLED Display
>> Frame protection/velcro included
>> Input – Any USB C (Device will manage input autonomously to a max of 30W)
>> Power bank function
>> Output to Gloworm Light – 30W max
>> Output to third-party device – 18W max
- Power Pack Care
The following steps should be taken to conserve the life of your Power Pack
>> Always store your Power Pack in a cool dry location.
>> Prior to long term storage, ensure your Power Pack is charged to appx 70% (not full).
>> You can charge and discharge your Power Pack as often as you like.
>> Keep your Power Pack away from direct heat sources
>> A Power Pack should be able to complete 500 cycles before losing capacity.
>> One full cycle consists of a complete discharge and complete charge. Part charges and discharges are not equal to a full cycle.
>> Several part cycles are better for the battery than 1 ‘full’ cycle.
For more information on your battery go to www.batteryuniversity.com
POOR BATTERY CARE WILL VOID WARRANTY
- Charging and Charge Times
To charge a Power Pack:
>> First, remove the o-ring from the 90 degree connector of the Power Cable and connect to the charger, then connect the straight plug to the Power Pack.
>> The OLED display will show a battery charge graphic. The graphic will be animated during the charge process.
>> When fully charged the battery graphic will remain on until the charger is disconnected.
>> Disconnect the Power Cable from the charger, reinstall the oring on the 90 degree connector, and plug into the light.
Charge Times – assuming zero charge
>> Power Pack 5
> Gloworm 20W Charger – 2 hrs 40min
> Gloworm 45W Charger – 1hr 45min
>> Power Pack 10
> Gloworm 20W Charger – 5hrs 15min
> Gloworm 45W Charger – 3hr 30min
NOTE – A third party USB-C charger can be used to charge a Power Pack. However, due to charging inconsistencies, specific charge times cannot be predicted. Even though there is no danger in doing so, Gloworm will not be held responsible for any damages caused as a result of using a third party charger.
- Mounting
>> A Gloworm Power Pack can easily be mounted on the frame of your bike, helmet or dropped into your pack or pocket.
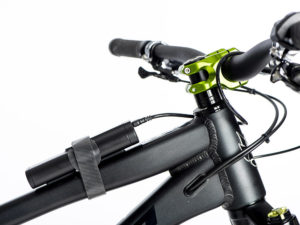
>> Each power pack has integrated fame protection and a velcro slot for secure mounting.

>> The supplied velcro is 50cm long and can be cut to length. We recommend when mounting to a frame that the velcro is wrapped multiple times for ultimate security.

- OLED Display
The Power Bank OLED screen will display information about battery and light performance and function during use and when charging.
>> BATTERY CHARGE GRAPHIC
Displays a digital image of a battery illustrating the level of charge in 10% increments. The graphic shows when: Power Pack is being charged (animated); being used by a third party device; when light is disconnected from Power Pack or if activated when not connected to another device (To activate: Place the Power Pack on the non-connector end for about 3 seconds. The OLED will turn off after 30 seconds).


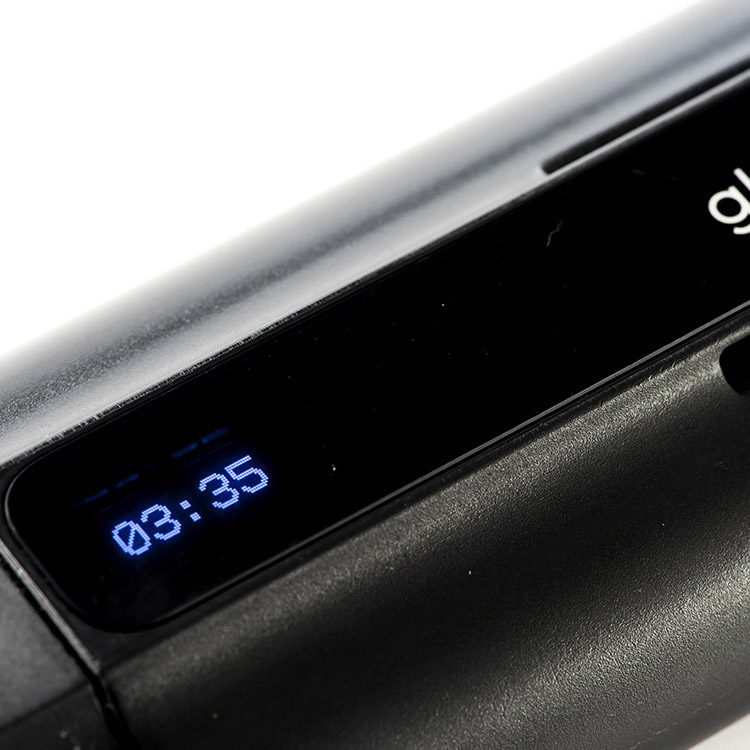
>> RUNTIME DISPLAY
When a Power Pack is connected to a light and the light is on, the remaining runtime will be displayed in hours and minutes (00:00). Runtime will change when light level is changed.
>> ‘PAIR TX’
The OLED will display ‘PAIR TX’ when the connected light is ready to be paired with a TX remote. Display will turn off after 15 seconds.

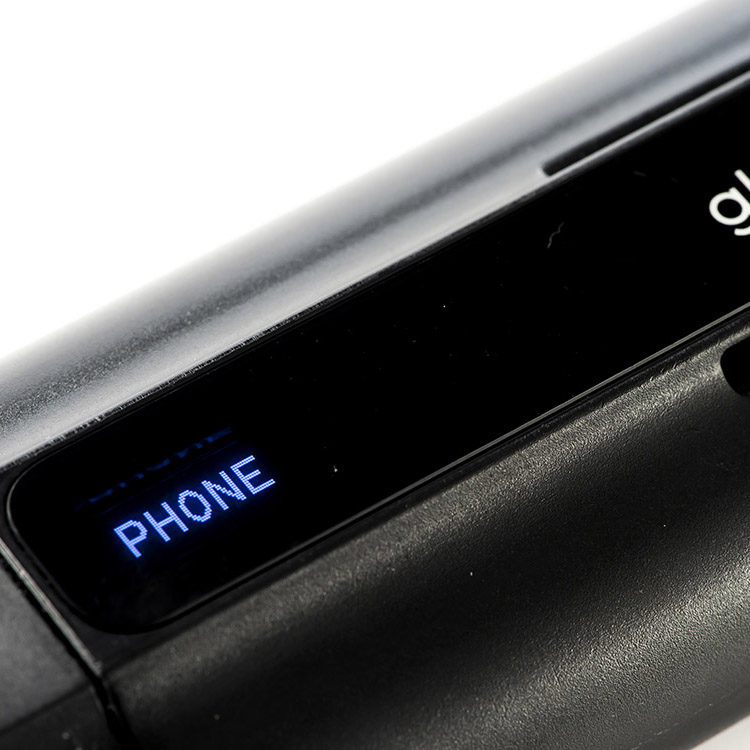
>> ‘PHONE’
When PHONE shows the Light System is ready to be paired to Gloworm Link mobile app.
>> ‘L1’, ‘L2’, ‘L3’ etc
When a light level change is made it will be indicated briefly using this abbreviated format.

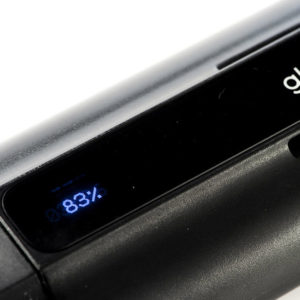
>> ‘52%’, ‘81%’, ‘39%’ etc
Following a light level change (and the light level abbreviation on the OLED) the percentage of battery charge will show before returning to the runtime display.

>> ‘S MODE’
S MODE will display briefly when light enters Special Mode.

- Power Bank Function
>> Power Packs can be used as a power bank to power and charge third party devices at a rate of up to 18W.
>> When charging a 3rd party device that supports USB PD, the Power Pack OLED display will show time remaining on the current battery charge. If the device does not support USD PD then the battery graphic, indicating the amount of charge remaining, will show.

NOTE Due to the nature of USB and the variety of available devices, we are unable to determine how fast a 3rd party device will charge. However, if a device can be charged using USB, the Gloworm Power Pack will be able to charge it.
>> Each Gloworm G2.0 light set is supplied with two USB adapters – USB-C and USB Type A. The USB adapters enable the use of a third party cable when charging 3rd party devices.
NOTE Failing to remove a third party cable/adapter after use will result in continued (slow) battery drain.


- Power Pack Firmware Updates
If Power Pack firmware requires updating it will be advertised when a connected light is paired to the Gloworm Link mobile app. Firmware updates are made via Bluetooth and full instructions will be given via Gloworm Link. The OLED display will show UPDATE when updating firmware.
Gloworm Link Mobile App
- Introduction
The Gloworm Link mobile app gives you complete control to customise your Gloworm G2.0 light.
Gloworm Link can be found in Google Play or the Apple App Store.
Within the app, you can make adjustments to light levels and see further info about your light and battery:
>> Set the number of light levels. Min 1 level, Max 4 levels
>> Choose if a light level will be a fixed beam or a flash pattern
>> Select one of 3 flash patterns or set the brightness (from 1% to 100%)
>> See how much runtime you will have on a full battery at any given level
>> Observe battery information in real time
>> Create profiles specific to riding locations or those using the light
>> Rename your light
- App Demo
Click below for a quick demonstration on how the Gloworm Link App operates when customising your light.
- App Screens
Click below to view the various app screens in the form of a video
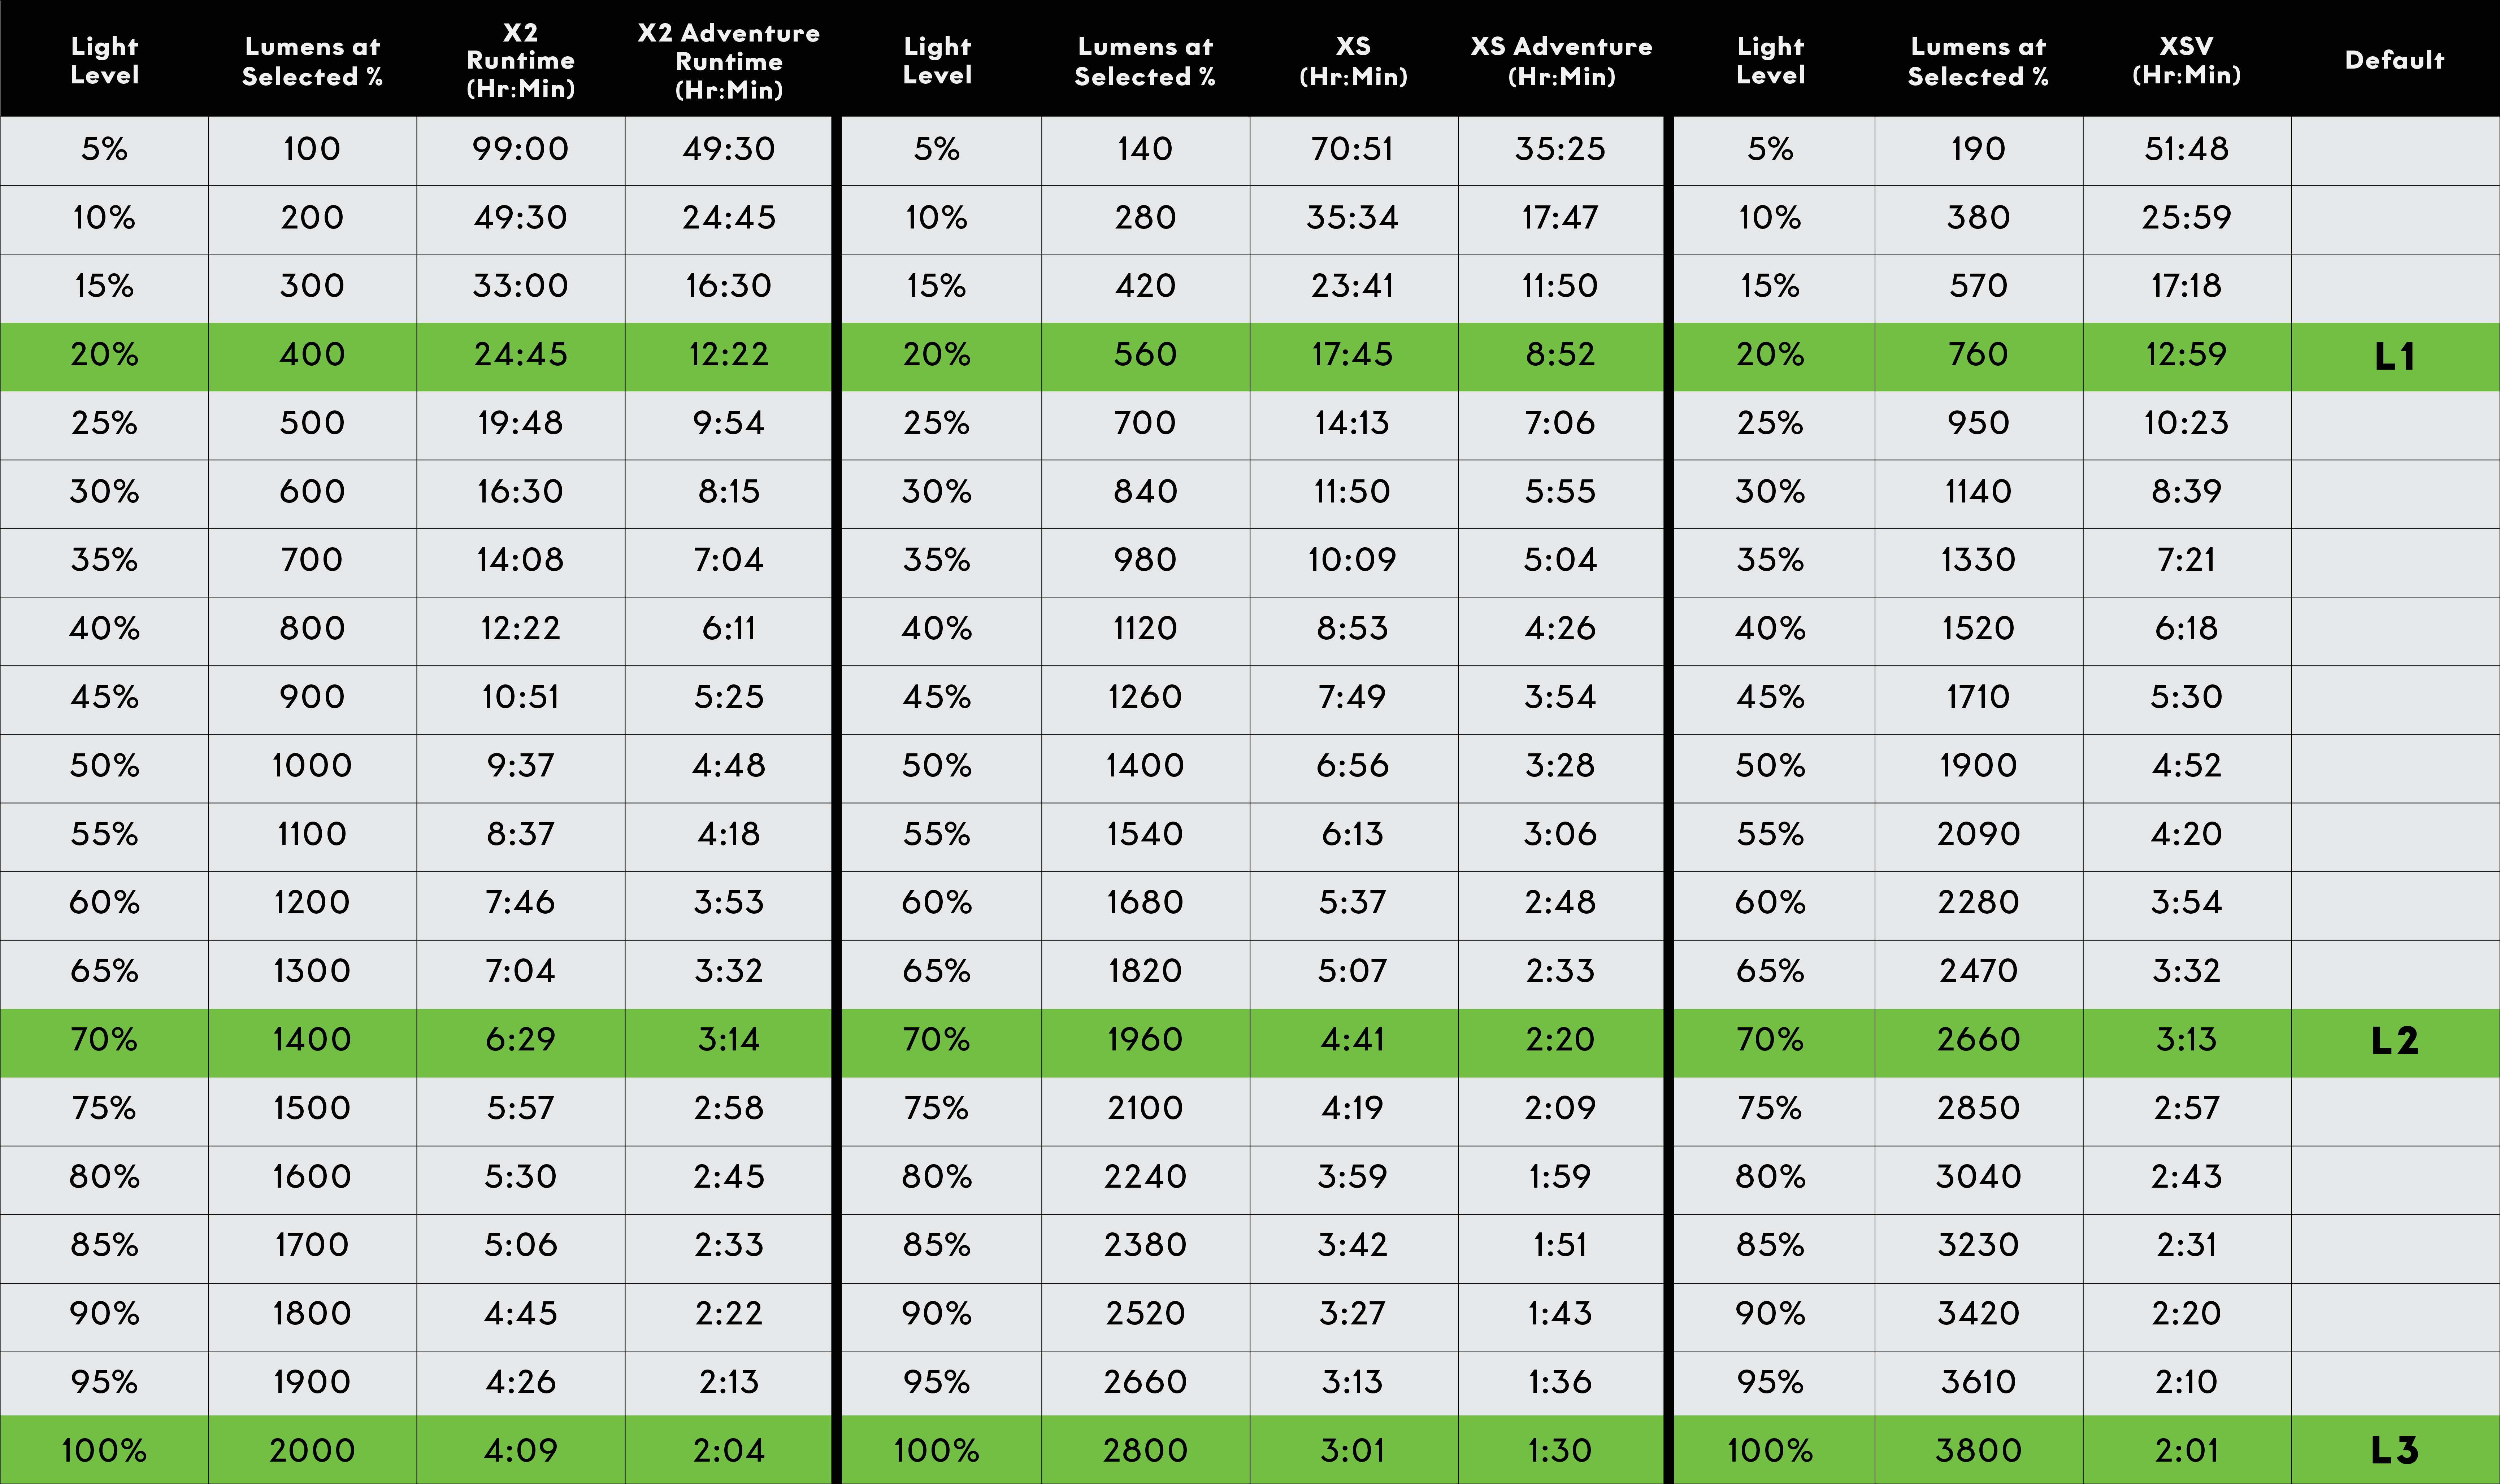
Runtime Matrix
- Gloworm X2 and X2 Adventure
- Glowowem XS and XS Adventure
- Gloworm XSV
- Disclaimer
The provided tables give an accurate representation of light runtime based on specific conditions. They are a very good approximation. If you intend to rely on runtime data, it is recommended that runtime tests are done in your specific riding location.
Factory Reset
- Factory Reset - Light
To return the light to the factory default settings, follow the process below:
>>Disconnect the light from the Power Pack
>>Hold the power button on the back of the light
>>Whilst holding the button, connect the light to the Power Pack
>>Continue to hold the button for about 10 seconds
>>Release the button when it glows purple.
>>When stops glowing purple, the light will be reset (This may take up to 2 min)
G1.0 user guides
User Guides & Videos
>> Basic Instructions – All Light Sets
>> Light and Battery Mounting – All Light Sets
>> TX (Wireless Remote) Instructions – Gloworm X2, X2 Adventure, XS, XSV
>> Advanced Operation and Programming – All Light Sets
>> Battery Care, Indication and Charging – All Light Sets
>> Runtime/Lumen Matrix – All Light Sets
User Guide Archive
Instruction Archive
Product FAQ
We pride ourselves in providing the most outstanding and professional customer service that caters to our customers specific needs. Please feel free to browse our frequently asked questions for the answers you are looking for. Alternatively, drop us a line HERE and our customer service team will be in touch as soon as possible.
Batteries
- Can i fly on a commercial airline with my battery?
Short answer is yes, but ultimately it depends on the regulations of each airline. Airlines rate batteries by Watt Hour (Wh) when enforcing their rules. Most airlines allow Li-ion batteries of 100Wh or less without any special conditions.
All Gloworm batteries are less than 100WH.
Watt Hour Specification by Battery Model:
- How often can I recharge a lithium-ion battery pack, what is the life expectancy?
The life of a battery pack depends on different factors. On the cell type, on how much it is used and on how it is treated. In general, a life of 300-400 charging/discharging cycles can be assumed before the battery’s capacity decreases significantly (80% of the nominal value). This corresponds to a minimum period of use of approximately 2-3 years if the battery is used twice a week. With careful storage when the battery is not in use, a life of 2-3 years is realistic.
- My G1.0 won't charge any more. What might be the cause and what can I do?
In many cases, the battery and the charger are in perfect condition, merely the battery protection has been triggered. To solve this, simply leave the battery connected to the plugged in charger and after a while (NB: it may take up to two hours) the battery will charge again.
- How do I store a lithium-ion battery for several months?
Charge the battery ideally to about 70% and keep the battery in a cool dry place for no longer than 3 months. Temperatures below 15°C are favourable. The fridge in an airtight container is a good option. Extreme example: Storage of a fully charged lithium-ion battery at 30°C (direct sunlight) irreversibly damages the battery – it may even fail completely.
- I used the lithium-ion battery only for a short time. Should I charge it again immediately?
It is best to avoid a full discharge as this can, over time, reduce the capacity of the battery. Li-ion batteries prefer small charges as opposed to full charges.
- My battery is draining when left plugged into my light, is this normal?
Yes, this is normal. There is a small amount of battery use required to maintain the connection with the TX remote. While this connection is active you will notice your battery drains a few percent each day. Once the TX remote connection deactivates (after approx 18hrs of no use) this will slow but not completely stop. We recommend you unplug your USB cable from your battery when not in use. If you notice your battery is draining while unplugged from the USB cable we recommend you update your battery firmware to the latest version.
- Why does my battery shut off at temperatures around freezing?
We’ve released a battery firmware update to improve the battery performance at low temperatures. Please update your battery to the latest firmware version via the process above.
- My G2.0 battery is completely flat and won’t take a charge, can you help?
If a Power Packs is run completely flat, sometimes they won’t accept a charge from a Gloworm Fast Charger. This is due to the battery not having the required charge to enable communication with the charger. In this case it is worth trying a non-fast charge power source (USB Type A cable, using the included USB Type A adapter plug) to trickle charge the battery for a few percent, after which it can be returned to the fast charger.
- Why am I not getting the advertised runtime out of my new battery?
The firmware our batteries run on can take a few full charge cycles to ‘learn’ the capacity of its cells. If you’re not getting the expected runtime, we recommend you cycle the battery through a few full charges and the calculated runtime should more accurately reflect our advertised runtimes.
- My battery is stuck in update mode, how do I fix it?
Once the battery firmware update process has started, the app and the battery communicate directly with each other without the need for the light. If this update process is interrupted, the battery may get stuck in update mode.
To restart the update process, unplug the battery from the light and restart the app to the paired devices screen.
Press the check for updates button and leave the phone and battery close to each other and the update process should resume. Contact us at [email protected] for further assistance with this process if required.
Tips
>> Ensure location services have been activated on your device and Gloworm Link App has been given permission to use device location.
>> Try deleting the light/battery profiles before reattempting the Update.
- Can I use my Power Pack to power other devices?
Yes, using the included USB-C adapter plug you can charge/power any USB-C device.
If the device is USB-PD (Power Delivery) compatible the Power Pack will deliver up to 20W of charge. Non Power Delivery devices will only receive a 5W charge.
Link App
- I can’t pair my light to my mobile device, any tips?
Please ensure you have installed the latest version of the Gloworm Link app. When installing the app you will be prompted to enable location services, please ensure you click yes to this prompt. In some cases it will be necessary to repeat the pairing process to complete it successfully. Restarting your phone can be helpful if you continue to experience issues. Contact us at [email protected] if you have further trouble pairing.
- Can I pair my G1.0 lights with the Gloworm Link app?
Unfortunately, no. Our G1.0 lights are not designed to work with Gloworm Link.
TX Remote
- How do I tell the difference between a G1.0 and G2.0 TX?
The G2.0 TX has light grey buttons and the G1.0 TX has black buttons.
- Why won’t my TX Remote stay paired to my light?
This is normal and helps avoid unnecessary battery drain in both the light and the remote.
Each time your light is unplugged from the battery it will require re-pairing.
For G2.0 models, the pairing will be lost of the light is left connected to the battery for more than 18hrs. To repair, disconnect the light/powerpack then reconnect and pair the TX.
General
- What is the life expectancy of the LEDs?
The LEDs we use boast an almost unlimited life expectancy. Therefore, it rather makes sense to look at how the luminance decreases over time. Our long-term tests indicate that the LEDs lose merely about 10% of their luminance after 2 years of PERMANENT operation (17,500 hours). To make it short: Life expectancy is no longer an issue!
- Which LEDs do Gloworm use in its lights?
Gloworm utilises CREE LEDs – Cree is the market-leading innovator of lighting-class LEDs. Currently we only use the XML2 LEDs and XPG2 LEDS in the CX Urban lights.
- Are our lamps waterproof?
The Gloworm X series lights are designed to an IP67 rating. This means they can be submersed but it is not recommended. The CX series is designed to an IP65 rating which means they are dust tight and can be used in rainy conditions.
- How often can I recharge a lithium-ion battery pack, what is the life expectancy?
The life of a battery pack depends on different factors. On the cell type, on how much it is used and on how it is treated. In general, a life of 300-400 charging/discharging cycles can be assumed before the battery’s capacity decreases significantly (80% of the nominal value). This corresponds to a minimum period of use of approximately 2-3 years if the battery is used twice a week. With careful storage when the battery is not in use, a life of 2-3 years is realistic.
- My battery won't charge any more. What might be the cause and what can I do?
In many cases, the battery and the charger are in perfect condition, merely the battery protection has been triggered. To solve this, simply leave the battery connected to the plugged in charger and after a while (NB: it may take up to two hours) the battery will charge again.
- How do I store a lithium-ion battery for several months?
Charge the battery ideally to 50-75% and keep the battery in a cool dry place for no longer than 3 months. Temperatures below 15°C are favourable. The fridge in an airtight container is a good option. Extreme example: Storage of a fully charged lithium-ion battery at 30°C (direct sunlight) irreversibly damages the battery – it may even fail completely.
- I used the lithium-ion battery only for a short time. Should I charge it again immediately?
Or rather use it again and discharge it? If you expect your next use to be no longer than the remaining capacity will last, do not charge the battery immediately. The life of a lithium-ion battery is also determined by the number of charging cycles. Each charging cycle, even the shortest, is recognized by the battery as such; therefore, rather avoid charging the battery unless it is really necessary.
- May I also operate the lamp without a cooling wind?
Yes, without limitations. All our lights are absolutely heat-proof. Caution! Please be aware the enclosure will heat up during use, however this is completely normal so please take care when handling in order to prevent injury.
- Can I use Gloworm LED Light Systems for activities other than Mountain Biking?
Absolutely! Whatever your passion is, be it riding, running, caving or adventure sport racing, Gloworm will be there to light up all your adventures!
- What if I don't like my light?
If you are not 100% happy with your purchase, return it within 14 days for a full refund. Plus we’ll even refund the return shipping. However we’re pretty sure once you get hold of one of our lights, you’ll never want to let it go!
- How do I become a Gloworm Distributor?
We are currently looking for distributors. If you are interested please CONTACT US to discuss.
LEDS
- Which LEDs do Gloworm use in its lights?
Gloworm uses CREE LEDs – Cree is the market-leading innovator of lighting-class LEDs. Currently we use the XHP35.2, XML2 LEDs and XPG3 LEDS.
- What is the life expectancy of the LEDs?
The LEDs we use boast an almost unlimited life expectancy. Therefore, it rather makes sense to look at how the luminance decreases over time. Our long-term tests indicate that the LEDs lose merely about 10% of their luminance after 2 years of PERMANENT operation (17,500 hours). To make it short: Life expectancy is no longer an issue!
- One of my LEDs has a black spot and is dim?
On occasion LEDS will burn out or be defective. If this occurs, please approach your local retailer and enquire about warranty or repair. Alternatively send us an email.
Waterproofing
- Are Gloworm Lights waterproof?
The Gloworm G1.0 and G2.0 series lights are designed to an IP67 rating. This means they can be submersed but it is not recommended. The CX series is designed to an IP65 rating which means they are dust tight and can be used in rainy conditions. See below for FAQ specific to each light model.
- Do I need the small o-rings on the G2.0 USB C cables?
Yes. These o-rings create the weather seal for the USB-C connector. If they are not in place there is a risk that water may enter the connector and cause the product not to work.
Firmware Updates
- Are there firmware updates available for my light and how do I run them?
Yes, we’re regularly releasing updated firmware versions for our G2.0 lights and batteries to improve performance. These can be accessed via our Gloworm Link app available in the Play and App stores. Gloworm Link will automatically detect if a firmware update is available for any paired devices. Follow the instructions provided by Link to complete any updates. It may be necessary to restart the app once the update is complete to see the new firmware version number displayed.
- What’s the latest firmware version?
You can view your current firmware version running on your light and battery in the paired devices screen. Current firmware versions as at 25/04/23 are…
X2, XS, XSV – 0.0.45
Power Pack 5, Power Pack 10 – 1.0.44
Warranty
1. Products damaged as a result of impact or exposure to extremes for which the product is not designed.
2. Products improperly used or not operated in accordance with the provided instructions.
3. Products used in conjunction with equipment or parts or as part of a system not manufactured by Gloworm.
4. Products repaired/disassembled by someone other than a Gloworm representative/manufacturer for a defect or malfunction covered by this warranty.
5. Products that are modified, altered or used as part of any conversion, sub assemblies or configurations.
6. Products that have been modified, neglected or poorly maintained, used for commercial purposes, misused or abused or involved in accidents. It is your responsibility to regularly examine the product to determine the need for normal service or replacement.
7. Damage occurring during shipment of the products (such claims must be presented directly to the shipper).
8. Products that are purchased used, or in not-new condition without original packaging. Damage to products resulting from improper assembly or repair (or the techniques used), the use or installation of parts or accessories not compatible with the original intended use of the product, or the failure to follow the productwarnings, installation and usage instructions. This warranty does not apply if the original product decals are removed or original finish has been modified or removed.
9. Products purchased at, adjusted and or assembled by non Gloworm Dealers.
10. Damage or deterioration to the surface finish, aesthetics or appearance of the product.
11. The labour required to remove and/or re-fit and re-adjust the item covered by this warranty or any product that it is attached to.
12. Any costs associated with returning or shipping non warranted products.
Limited Manufacturers Product Warranty
13. Normal wear to the product. Components may have symptoms of wear in less than their warranted time frame depending on amount of use, type of use and other conditions. This includes products that have reached the end of their normal life expectancy before the warranted time frame expires.
14. Products purchased through unauthorized distribution channels
Parts Covered
This warranty covers for 12 months any products/part/accessories sold as a Gloworm Product, with the exception of Light Heads which will be warrantied for 24 months.
Statement of Remedy
In the event that the product does not conform to the warranty at any time while the warranty is in effect, the warrantor as its discretion will repair the defect or replace the product and will return it to you without charge for parts or service.
To Obtain Warranty Service
Consumer claims for warranty service must be made through the Gloworm retailer from whom the product was purchased. Gloworm will not be responsible for products lost or damaged in shipping.
Warranty Determination
Once received by Gloworm the product will be inspected to determine if it is covered by the Gloworm warranty. Only Gloworm may determine if a product is warrantable. If the product is not covered under warranty, all replacement, repair, labour, and shipping costs are responsibility of the customer. Gloworm will make the final decision on whether or not shipping charges will be charged for the shipping of the replacement product. When a product or part is exchanged, any replacement item becomes property of the customer and the returned product becomes the property of Gloworm, which may destroy it.
THIS WARRANTY DOES NOT COVER OR PROVIDE FOR THE REIMBURSMENT OR PAYMENT OF INCIDENTAL OR CONSEQUENTIAL DAMAGES.
Shipping and Delivery
- Does Gloworm ship internationally?
Shipping of your order will be from one of our distribution partners or direct from Gloworm in NZ. We currently have distribution networks in New Zealand, Australia, Europe, USA and Canada. Rest assured you will receive fast and effective service no matter where you live in the world. Shipping will take between 2-7 days depending on location.
- Do I need the small o-rings on the G2.0 USB C cables?
Yes. These o-rings create the weather seal for the USB-C connector. If they are not in place there is a risk that water may enter the connector and cause the product not to work.
- Will I be charged customs and import taxes?
We ship using our distribution partners. If you live in the same country or region as one of our partners you may avoid paying any import taxes as the product may not cross any borders.
All orders from New Zealand will incur 15% GST, but no import tax. All other purchases will not incur sales tax at checkout. When viewing a product, we suggest you use the currency/location selector. Prices will then be indicated in the currency you will pay when completing your order.
Any taxes/fees incurred by the buyer at the point of importation are the sole responsibility of the buyer. These charges are to be paid by the recipient and unfortunately, we have no control over them.
- Do you offer free shipping?
Yes! We offer free shipping on any order over $150USD, to anywhere in the world.
- Where do orders ship from?
All orders are shipped from our international distributors.
New Zealand and Asia Orders – Ship from New Zealand
Australia Orders – Ship from Australia
Europe Orders – Ship from Greece
USA Orders – Ship from USA
Canadian Orders – Ship from USA